Caching PowerShell modules in Azure Pipelines
Intro
This is a short post to demonstrate how you can use a cache in Azure DevOps (Azure Pipelines) to store any PowerShell module that you need during your pipeline.
Don’t let your pipeline rely on the availability PowerShell Gallery!
This goes for anything really, but in this post I’m focusing on the PowerShell Gallery. There are two simple reasons for this statement:
- Downloading modules from the gallery takes time, not something I want to do every time I run my pipeline.
- The gallery could be unavailable, I don’t want this to break my pipeline.
For these reasons I want to cache any downloaded module or other dependency between each pipeline execution. To be fair, I would probably be even better of if I also hosted all dependencies in my own private gallery, but that is a post for some other time.
Preparing the pipeline
I like to set any configurable value that I might want to change in the future or between projects or environments as pipeline variables. This both reduces the need for typing the same value more than once and it also makes it a lot easier to change a value when each value only exists once and all changeable values are defined in the same place. Keep it DRY (Don’t Repeat Yourself) as the kids say (or do they?).
So that being said, let us set up a few variables. We’re going to need a place to store out modules and the path to a script that downloads them.
Once that’s done we need to write the script to download the modules. In my simple example I’m going to use the module ModuleBuilder as an example. My script will take one parameter of Path to where the modules should be saved. Then I’ll use Save-Module to download the moduels from PowerShell Gallery.
It is important here to specify exact which version of each module we want, because I’m going to use the hashsum of this script as part of the key that identifies our cached data. Meaning that if we change the file, the cache will be invalidated and the script will run to download the modules again.
If you have many or complex dependencies, I recommend separating the script that downloads them from the configuration. In these cases I usually have a dependencies.json or a psd1-file with the configuration and I use both the script and and configuration file to calculate my hash key. More on that later. Here is the script I’ll use for my example:
Using the cache task
It’s not at all as hard as it sounds! There is a built-in task for caching folders in Azure DevOps Pipelines! Is is simply called “Cache” and it’s documented over at Microsoft docs.
We simply use it like this:
The cache task takes three inputs: a key, a path and a variable name. Let’s look at their definition from the documentation.
Key (unique identifier) for the cache
This should be a string that can be segmented using ‘|’. File paths can be absolute or relative to $(System.DefaultWorkingDirectory).
Path of the folder to cache
Can be fully qualified or relative to $(System.DefaultWorkingDirectory). Wildcards are not supported. Variables are supported.
Cache hit variable
Variable to set to ’true’ when the cache is restored (a cache hit), otherwise set to ‘false’.
Here you can se that we are setting the key for our cache. Just like is says in the documentation, we can use strings or paths to files separated with pipe-char. In this example I’m using the string restoremodules in combination with the path to my script. If I had my configuration in a separate file I would have added the path to that file here as well.
The output of this task will show how the key is resolved, it lookes like this:

Task to download dependencies
Next up we need to run our restoremodules.ps1 script in task. This task should only run if the modules have not been restored from cache. This is solved by adding a condition that requires the pipeline variable PSModules_IsCached to not be true. Here is the yaml for that:
This part is fairly self explanatory. Now we have everything we need for a working cache!
To demonstrate how this works I will add an extra task that only runs if the cache was restored, that looks like this:
Loading downloaded modules
Since I chose to download the modules to their own folder, PowerShell will no know that they are there and will therefore not load them automatically. This means that I need to either load the modules using their path, or tell PowerShell where they can be found. I can tell PowerShell were to look for them by adding them to the environment variable PSModulePath
Here I would like to have a task that just sets the PSModulePath variable for all the remaining tasks in my pipeline, but I have not found a good way to do that so I’m simply modifying PSModulePath in each task where I need the modules to be loaded (usually not that many anyway).
Here is how that looks:
Summary
To summarize, if we want to cache PowerShell modules (or anything really), we can add a cache task that looks for the content if our cache. The cache task will automatically add a post-task to our pipeliene where it will upload the folder we specified to the cache.
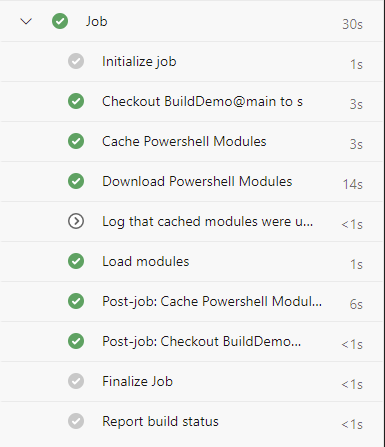
The first time my pipeline runs it will look like this:
 We can see that the task Download PowerShell Modules is run and there is a post-job that uploads the folder to my cache.
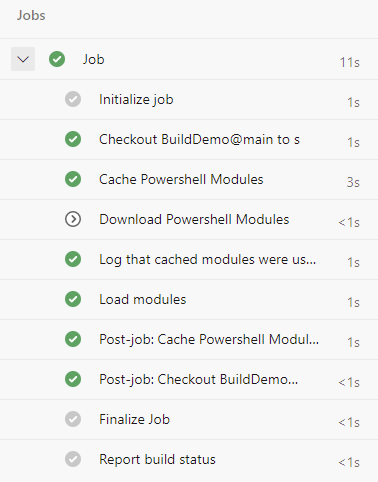
If I run the same pipeline again it will look like this:
 Here the task Download PowerShell Modules is skipped and we saved a whole 11 seconds! Not a great time saving since it is a really small module in this example, but we also know that our pipeline will run without having a dependency on the PowerShell Gallery to be available.
My whole pipeline yaml looks like this:
Let me know how you are using cache! Leave a comment down below.