Azure Functions and Azure AD authentication
This post is part of a series about Azure Functions and PowerShell. Check out the list of other posts in the series!
Azure Functions and Azure AD authentication
Azure Functions are easy, cheap and scalable.
PowerShell is a powerful language perfect for automating and authoring integrations that “glue” systems together.
This is a match made in heaven for me, but how do I know and validate who calls my code? This is where Authentication enters the scene. Authentication is all about verifying who connects to my application so I (or my code) can determine if they should be authorized to do so or not.
Require Azure AD user to sign in to Azure Functions
Let’s start simple. I want users to authenticate with AzureAD when they call my function.
This scenario is actually really simple because it’s a feature included in Azure Functions, or to be fair, it’s included in Azure App Service which Functions are built upon. This feature can be enabled in one out of two management modes, Express or Advanced. And since I like to really understand how things work, I’m going to cover them both.
The feature we are using for this used to be called easyauth. Searching for Azure App Service and easyauth or “easy auth” might get you some valuable information.
Choosing between Express and Advanced mode for authentication
As in most other cases, there is an easy way, and a less easy way to do things. In this case, the easy way is called Express mode. To quote the mouse-over explanation:
“Express mode will use your default AAD and can create an AAD application for you. Select advanced mode if you want to have a custom AAD configuration”
Express mode can be set up in seconds and works for most simple scenarios, but you can only set it up once and I often end up in a situation where I want to change things later, which is a bit harder when using Express mode.
There are also a another drawback of express mode that you need to be aware of. At the time of writing this in October 2020, express mode sets up an Azure AD V1 application. If we want to use the newer V2 endpoint we need to use advanced mode. Microsoft recommends using the V2 endpoint for new projects. Checkout why update to Microsoft Identity Platform (v2.0) for more information.
Active Directory Authentication Express mode
In this scenario I assume that we have a working Function App and that the user that performs these steps are allowed to register applications in Azure Active Directory.
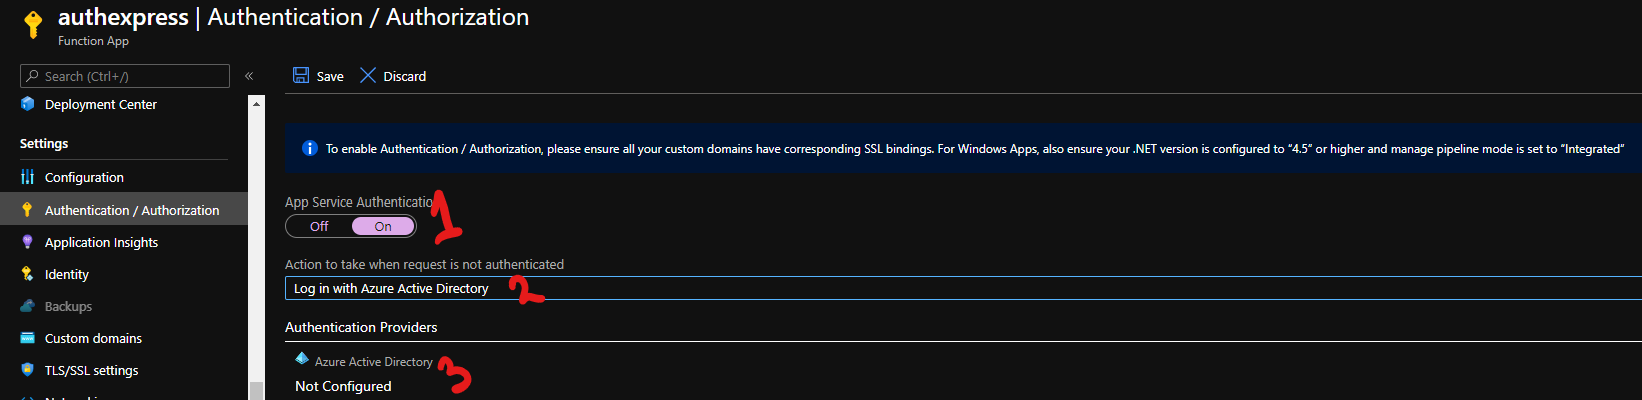
Start by going to the “Authentication / Authorization” blade.
As the warning text tells us, we need to have our SSL config in order, use .NET version of 4.5 or higher and set manage pipeline mode to “integrated”. Since this is the default settings for a new Function App I’m not going to go into this here.
Turn on App Service Authentication, set the dropdown “Action to take when request is not authenticated” to “Log in with Azure Active Directory”. This will redirect any unauthenticated request to a sign-in prompt.
Under Authentication Providers, click on Azure Active Directory.
Once in Azure Active Directory Settings, change Management Mode from Off to Express, choose a good name for your new app (it needs to be unique in your tenant), leave the rest as is and click OK.
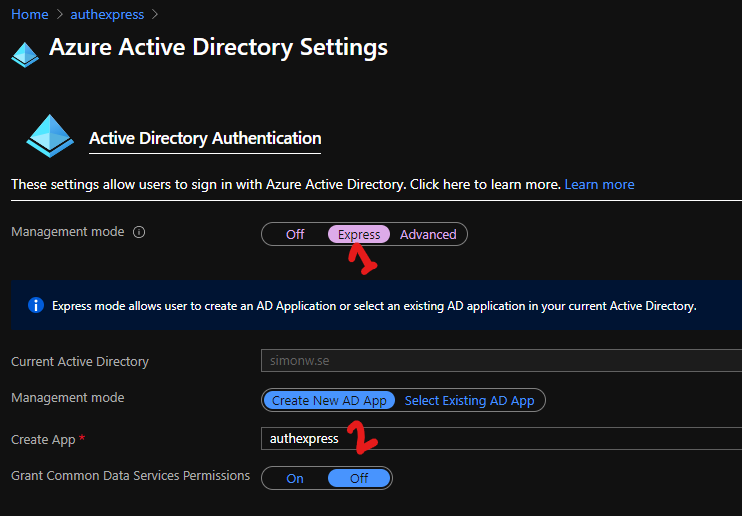
Once back in the authentication / authorization blade, don’t forget to click that save button.
And simple as that! We now have a function that requires Azure AD Authentication! Let’s try it out!
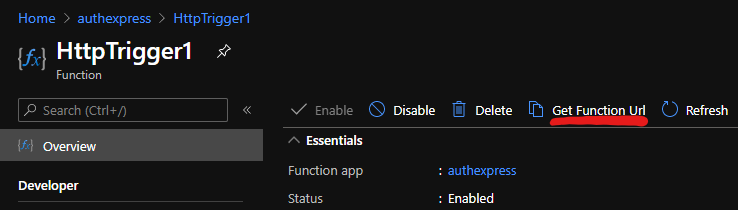
Get the URL to a function by going to Functions, choose a funciton, in my case “HttpTrigger1” and click “Get Function Url” on top of the blade.
Enter the full function Url in a web browser and you will be redirected to a sign-in prompt. If this is the first time you sign in to this application, you will be presented with a consent request.
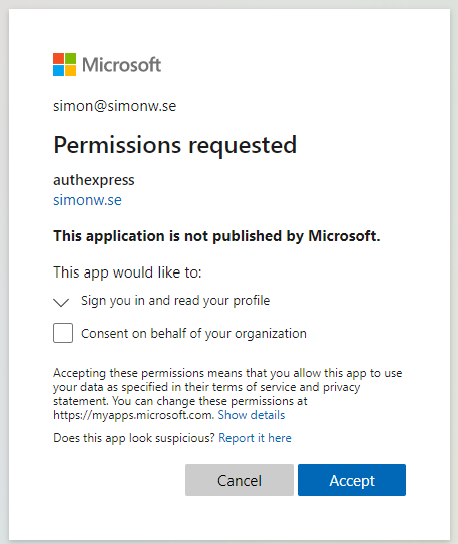
If you are an application administrator in the tenant, you will also see a checkbox saying “Consent on behalf of your organization”. Just clicking Accept will accept for only the current user. Checking the box and then clicking accept will grant the app consent for every user in the tenant, so called admin consent.
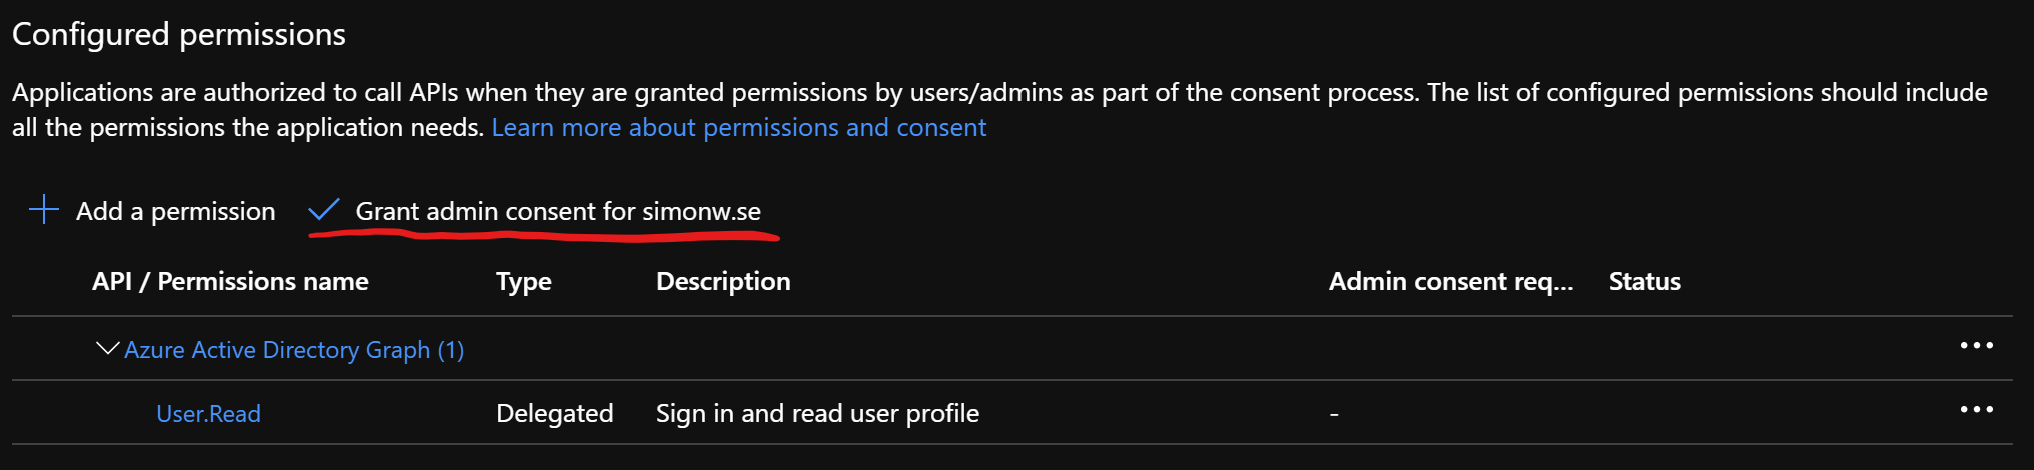
To not get this question at all, we could grant admin consent before we try to log in. This can be done in the Azure Portal by navigating to Azure Active Directory and the App Registrations blade. Select the tab “All Applications”, locate the app that was just created and go down to “API Permissions” in the left menu. In the new blade that opens we can see that the application requires the delegated permission of User.Read to the Graph API. To approve this for all users in your organization, just click “Grant admin consent for <your domain>”.
And that’s it!
Active Directory Authentication Advanced mode
If any of the statements below are true, you probably want to go with the advanced settings for Authorization.
- I want to use the new Microsoft identity platform
- I want to use an app registered in another Azure AD Tenant
- I want better control and understanding of what I set up
- I don’t have access to create applications my self and need to ask someone to create them for me
To set up Authorization with advanced settings we first need to create an app registration for our API.
Since I’m not a fan of clicking in portals I like to do this with some kind of script. This time I’m going to use Azure CLI from PowerShell. Update the display name and identifier uri to fit your scenarion and run the script.
This script does a few things. First I’m configuring a display name for my application and the name of my Functions App.
Then I’m gathering some access permissions that my app requires to get information about the signed in user. I do this so I can consent all these permissions in my script and never have to see that consent dialog.
Once we have all that information we create the application using az ad app create and a service principal using az ad sp create.
Then we grant the permissions email, openid and profile for all users, this is the consent part.
Last we set requestedAccessTokenVersion to value 2. This will set the value accessTokenAcceptedVersion in our manifest to 2 and tell Azure AD that we want V2 endpoint tokens. Now Azure CLI is currently using the Azure AD Graph API which does not support this, so I’m using az rest to call Microsoft Graph for this step.
$ServerAppDisplayName = 'MySuperAPI'
$SystemName = 'mycoolfunction'

# Get tenant id of current tenant
# (make sure to be signed in with az cli)
$TenantId = az account show --query 'tenantId' -o tsv
# Server app identifier, needs to be unique
# I'll default to an azure websites url
# Update to something that fits you
$ServerAppIdentifierUri = "https://$SystemName.azurewebsites.net"

# ReplyUris, this is where AzureAD will send the token.
# Make sure to get this right!
$ReplyUri = "https://$SystemName.azurewebsites.net/.auth/login/aad/callback"


# Create configuration for delegated permissions to graph API
# Get application id of Microsoft Graph
$GraphAppId = az ad sp list --query '[?appDisplayName==''Microsoft Graph''].appId' -o tsv --all
# Get all permissions available to graph
$Permissions = az ad sp show --id $GraphAppId --query 'oauth2Permissions' | ConvertFrom-Json
# Select the permissions we need
$EmailPermission = $Permissions.Where{ $_.value -eq 'email' }.id
$ProfilePermission = $Permissions.Where{ $_.value -eq 'profile' }.id
$OpenIdPermission = $Permissions.Where{ $_.value -eq 'openid' }.id

# Build part of a manifest for requiredResourceAccess
$requiredResourceAccess = @(
    @{
        resourceAppId  = $GraphAppId
        resourceAccess = @(
            @{
                id   = $EmailPermission
                type = 'Scope'
            },
            @{
                id   = $ProfilePermission
                type = 'Scope'
            },
            @{
                id   = $OpenIdPermission
                type = 'Scope'
            }
        )
    }
) | ConvertTo-Json -AsArray -Depth 4 -Compress | ConvertTo-Json
# Pipe to ConvertTo-Json twice to escape all quotes, or az cli will remove them when parsing

# Register the application
$ServerApp = az ad app create --display-name $ServerAppDisplayName --identifier-uris $ServerAppIdentifierUri  --required-resource-accesses $requiredResourceAccess --reply-urls $ReplyUri | ConvertFrom-Json
# Create a service principal for the application
$null = az ad sp create --id $ServerApp.AppId

# Consent the application for all users
$null = az ad app permission grant --id $ServerApp.AppId --api $GraphAppId --scope "email openid profile"

# Set application to use V2 access tokens
$Body = @{
    api = @{
        requestedAccessTokenVersion = 2
    }
} | ConvertTo-Json -Compress | ConvertTo-Json
# Pipe to ConvertTo-Json twice to escape all quotes, or az cli will remove them when parsing
$null = az rest --method PATCH --uri "https://graph.microsoft.com/v1.0/applications/$($ServerApp.objectId)" --body $Body --headers "Content-Type=application/json"

# Output the ClientId for use later
Write-Output $ServerApp.AppId
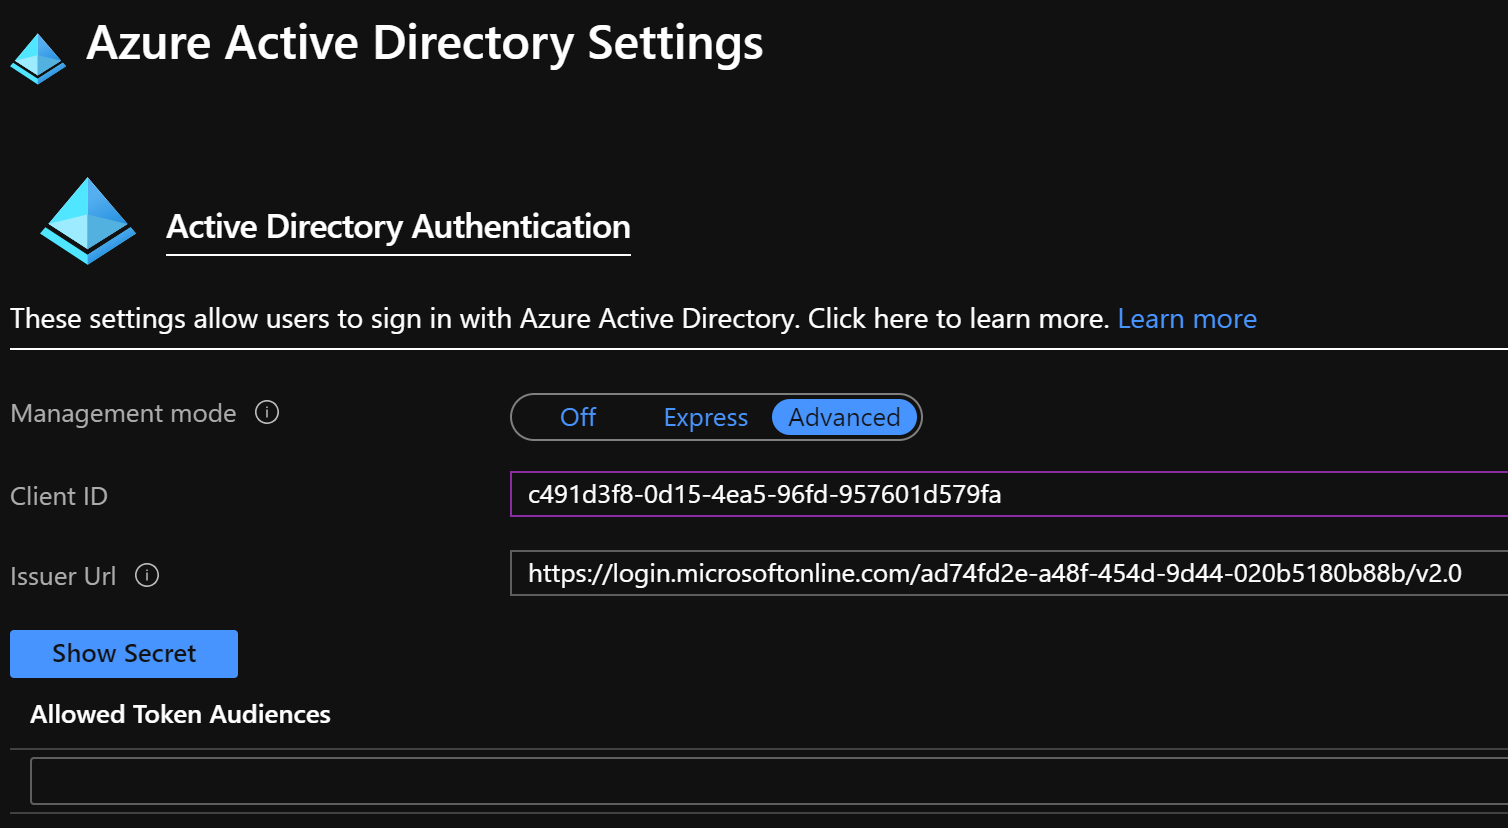
In my case I got the AppId of c491d3f8-0d15-4ea5-96fd-957601d579fa. This is also known as the clientId for my app. We’re going to need this later so make sure to write it down.
Let’s head over to our function app in the Azure Portal. Navigate to the Authentication / Authorization blade, choose On, use the action “Log in with Azure Active Directory” and click on Azure Active Directory, just like we did with the Express Mode.
This time we’ll select Advanced instead of Express. Here we need to enter the ClientId (AppId) from our registration above as well as an Issuer Url. The Issuer Url consists of the following parts: “<authentication-endpoint>/<tenant-id>/v2.0” where authentication endpoint for Azure AD in global Azure is https://login.microsoftonline.com. For other clouds check Azure AD authentication endpoints. You can get your tenant id in the portal or by running az account show or using the PowerShell command Get-AzContext.
And now we should be able to browse to our function, get redirected to a sign-in page and then arrive at our function. Simple as that!
Conclusions for authentication
To summarize, if you a ready to spend a few minutes instead of a few seconds to configure authentication, going the so called advanced route can be well worth the effort!
As we have seen above, to get an access tokens we need an application registered in Azure AD. The applications we have created so far are designed to act as a web server application. This means that when a user signs in, the token issuer (Azure AD in our case) will not return the access token to the client, Azure AD wll send it to the redirect URI specified by the client. Azure AD will only accept redirect URIs that is listed in our application registration. This means that it is EXTREMELY important to add the correct redirectURIs and only those.
In the advanced scenario above we set this redirect URI to our functions URI followed by “/.auth/login/aad/callback”.